How to Write a Check
Writing a check may feel like a bit of an anachronism in today’s digital world, where the online banking and mobile payment apps reign supreme. Even in our world of instant digital payments, knowing how to write a check remains a valuable life skill. Whether it’s paying rent to a landlord who prefers paper, giving a wedding gift, settling a bill with a small business, or handling a specific financial transaction, checks haven’t disappeared entirely.

Gather What You Need -
Before you begin, make sure you have the following:
- A Blank Check. Issued by your bank, usually in a checkbook. Never use ‘a check’ of an outdated format.
- Ballpoint Pen (Preferably Blue or Black Ink). Avoid pencils. Using ‘erasable ink, gel ink or incorrect color’ can lead to disputes or rejected checks.
- Payee Information. The full, legal name of the “person or business” you’re paying. The payee’s name exactly as it appears on their bank account.
- Proof of Balance. Check your ‘check register, online banking, or a recent statement’ to confirm you have sufficient funds.
Step-by-Step Guide to Filling Out a Check -
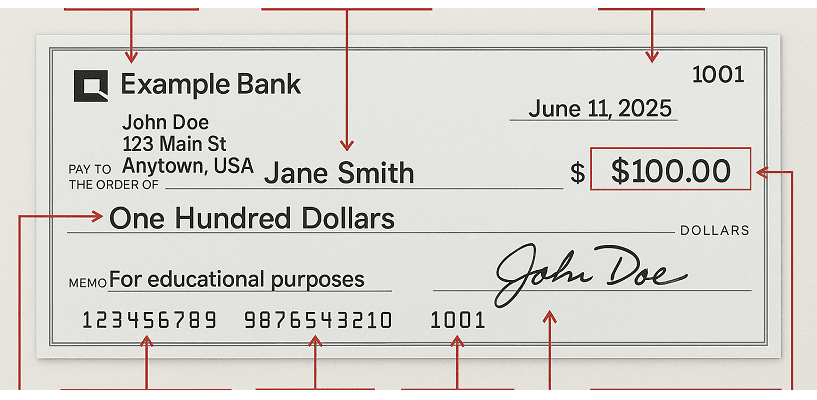
Step 1: Write the Date -
- Where: Upper-right corner on the “Date” line.
- How: Use the current date in whatever format you prefer (e.g., “June 5, 2025” or “06/05/2025”). Writing out the full date (month/day/year) can help avoid confusion or alteration.
- Important: Never post-date a check (i.e., avoid writing a future date) expecting it won’t be cashed until then. Banks can usually process checks as soon as they receive them, regardless of the date.
Step 2: Write the Payee Name -
- Where: On the line that reads “Pay to the Order of.” On different check stocks (and in other jurisdictions), you may see different phrases in place of “Pay to the order of.” Common alternatives include: “Pay to,” “Pay,” “Pay to the bearer,” “Payee,” or “For payment to.”
- How: Enter the full, legal name of the individual or business exactly. Avoid abbreviating the payee’s name unless it’s a part of their legal name. Example: “John T. Smith” (for a person) or “Green Valley Landscaping LLC” (for a company). Do not use titles like “Mr., Mrs., Ms., or Dr.” unless it’s part of their legal business name.
- Important: DO NOT “cross out, white-out, erase, or attempt to correct” a mistake on the Payee line. If you make an error, ‘void the check’ and “tear it up or securely destroy it after recording it in your check register.” Start over with a brand-new check.
Step 3: Fill in the Numeric Amount -
- Where: In the small box to the right of the ‘payee line,’ usually preceded by a dollar sign (“$”). If your check’s amount‐in-numbers box doesn’t already have a “$” printed, don’t worry — just add the currency symbol yourself before writing the digits.
- How: Write the exact amount you’re paying in numbers, including cents. For instance, if you’re paying one hundred twenty-five dollars and fifty cents, write “125.50”.
- Important: Draw a ‘line’ after the cents to prevent anyone from adding numbers (e.g., $125.75 —). Fill the entire box, if possible, to deter alterations.
Step 4: Write the Amount in Words -
- Where: On the long line beneath the payee’s name.
- How: Spell out the dollar amount in words, followed by the “cents” as a fraction over 100. If there are no cents, write “and 00/100.” Example: For $125.75, write “One hundred twenty-five and 75/100”.
- Important: Fill the remaining blank space on that line with a straight line or “a series of hyphens” so no one can add extra words or digits. Filling the space makes tampering obvious or impossible.
Step 5: Fill in the ‘Memo/For’ Line (Optional but Helpful) -
- Where: The bottom left corner, often labeled “Memo,” “For,” or “Re.”
- How: Use this space to note ‘the reason for the check’ or reference an account/invoice number. This isn’t required for the bank to process the check, but it’s helpful for your records and the recipient’s (e.g., “June Rent,” “Invoice #1234,” “Birthday Gift”).
- Important: Do not put sensitive info like your SSN here.
Step 6: Sign the Check -
- Where: Bottom right line labeled “Signature.” The line in the bottom right-hand corner.
- How: Sign using the same ‘name or signature’ on file/record with your bank. Ensure it matches exactly, including any middle initials if your bank requires them.
- Important: Without your signature, the check is not valid and the bank will refuse to honor it. Never sign a blank check!
Step 7: Record the Check in Your ‘Check Register’ -
- Why: This step is critical for ‘keeping track of your spending’ and ensuring you don’t overdraw your account.
- How: In your “check register” (either in your physical checkbook or a digital ledger), note: ‘check number, date written, payee name, amount of the check, and remaining balance after writing the check.’
Step 8: Advise the Payee to Properly Endorse the Check -
- What to tell the payee: Please ‘endorse’ this check on the back in accordance with the bank norms. If depositing it, add ‘For Deposit Only’ to protect it.
- Why it matters: A restrictive ‘endorsement’ adds an extra layer of security by preventing anyone else from “cashing or depositing the check.”
That’s all friends.
Suggestions or corrections for this page can be submitted from the “contact us” page.
Ads Section

